Showing posts with label artist profile. Show all posts

Hot House Petunia Designs

While on the road in Nashville for the TNNA Nashville show we had a visit from Susie Porter of Hot House Petunia Designs.  Susie was showing off her catalog of fun punch needle charts she is selling through Cross My Heart Ltd.

Here are just two of her designs...

Hearts Desire #PN02
This cute design uses Kreinik Blending Filament in color # 032 Pearl to make a scrumptious cupcake.   Need another reason to buy this chart?  A portion of the profit from the sale of this chart will be donated to breast cancer research.


Snow Birds #WM03
This design features a cute cardinal and bear enjoying the snow unlike some other snow birds we all know hiding out down south.  This design also uses Kreinik Blending Filament in color #032 Pearl.

To buy these charts or any of Hot House Petunia Designs visit Cross My Heart Ltd located at 1141 Kenny Centre Mall, 43220-4036, Upper Arlington, OH, USA - Phone:  614.442.0820.  Visit them on the web at:  http://crossmyheartltd.com/cmh/about

Read more...

Karen Boutte: quilt designer and friend


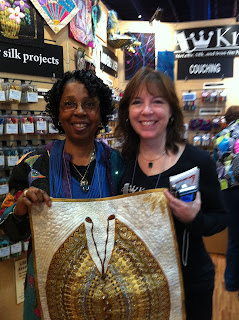
One of the best parts of attending a quilt market or festival is meeting designers, who, in our world, are celebrities. Karen Boutte is one such person — she is a fabulous designer who always carries a smile, hug and great idea. At the last show, she brought us a stunning butterfly quilt, made using our threads for surface embroidery (like ribbon, braid, 3/8" Trim). Read on to get to know Karen and discover her tips for using decorative threads.

Artist Profile: Karen Boutte (left in picture)
Specialty: Designer and Teacher, Quilts, Wearable Art
Web Site: http://www.karenboutte.com/
Blog: http://delightfuldiva.blogspot.com/

Q: How did you get started as a quilter?
A: I did begin sewing as a child.  My mother made all of my clothes and she would let me play with her scraps.  I made some doll sized accessories, but not doll clothes.  This started when I was about 6 years old and then I was hooked.  By Junior High, I was making dresses for myself. I didn't start quilting until much later. It was after a family reunion in 1989 that I got interested in quilts when I saw a Cathedral Window quilt that my Great Aunt Nora made.  Another "oh my" moment; I was hooked on quilting.

Q: Tell us about the butterfly quilt you made for Kreinik. What was your inspiration?
A: Couching Butterfly was inspired by a Robert Kaufman fabric for the "Grandeur" collection.  I guess you can call me the "Fabric Whisperer".  When I walk into a quilt shop, some fabrics just talk to me.  I am always on the lookout for exciting bold prints.  To compliment these I search for tone on tones that offer texture and movement.  The background for the Butterfly quilt is a Northcott "Stonhendge".  I saw the Kaufman fabric and it just said ..."buy me, I am beautiful and you will find a way to make something out of me" so I bought 3 yards (my minimum for a beautiful print since I can make a jacket with that amount of fabric).  The fan shapes in the fabric reminded me of butterfly wings, so I just started cutting and arranging.  Most of my garments are fabric collage, so the more action in the print, the more holes it will have in the end.

Q: How did you use the various Kreinik threads on the quilt?
A: Embellishing with the Kreinik threads was the fun part! After cutting out the wings, I stitched them in place using the Kreinik High Speed metallic thread around the edges in Antique Gold.  I then began playing with the 1/8" metallic ribbon to cover the edges of the wings.  I then took the 3/8" Trim (a wired ribbon), wrapped it around a cuticle stick, slid off the coil, laid it on the butterfly wing and flattened it to look like rick-rack.  I sewed this down with a decorative stitch using Kreinik's silver high speed metallic thread.

I used the gold wired 3/8" Trim and wrapped it around a flat ribbon and stitched it down with Kreinik's gold high speed metallic thread.  The antenna, body and tail of the butterfly are 3/8" wired Trim in Hot Chocolate color.  I twisted the top wire, stitched in place and hand stitched beads in the centers.  I wrapped the center body thread around a pencil and gently stretched it over the center seam.  I added drop crystal beads for accent.  The end of the tail in strung through a 1/2" copper bead.  I added several rows of hot fix crystals to enhance the print of the fabric and add balance to the wings.

I used free motion stitching on the background to tie the piece together.  I used an echo stitch near the sides of the wings, followed by what I call my small ballon stitch.  Around the antenna I added my "rock" stitch and used my "wondering meander" stitch around the tail.

Q: As quilters, we often focus on the piecing of the quilt, rather than the top-stitching or embellishing part. But your quilts and wearable art designs show people how much fun the thread play can be. Do you have any advice for people who may be intimidated by picking embellishment threads, or don’t know where to start? (Would it help to have a “quilt diva” attitude? How can we become quilt divas?)
A: We all have an inner Diva that is struggling to get out and play! When I teach my classes, I request that my students leave the "rules" outside the door and just play with their thread and decorative stitches.  We buy sewing machines for several thousand dollars and for the most part use only the straight stitch and zig zag and maybe some free motion thrown in.  My mission is to show students how exciting the most mundane stitch can look when combined with decorative thread, like Kreinik's Fine Twist, Fashion Twist and Metallic High Speed thread.

If you are a little timid about using glitzy thread or decorative stitches, pick one fun stitch (example, a scallop satin stitch), pick a print fabric and some contrasting thread.  This could be a 4" square to test.  Cut two 4" squares and set one aside. Iron a stabilizer or use batting on the back of one square and stitch a line of scallops across the fabric.  Go back to the beginning and stitch another line of scallops, right next to the first or mirror image the first line of stitches.  After that, maybe run a straight stitch on the outside of each row of scallops.  You have just created a ribbon stitch that no one else will have!  Look at this 4" square and compare it to the plane square, I bet you will like the outcome.

The worst that can happen is that you don't like the combination.  You've only used a 4" square of scrap fabric and a little thread.  Toss it out and try another combination or keep it as a reminder of what you don't like.  I keep a notebook of my stitch combinations and samples of the ones I like noting the stitch number, length, wide and thread used.  It's fun, easy and a good way to play with the wonderful threads and all those lovely stitches on our machine.

Q: Is there a rule of thumb, or advice for how to pick fabric prints that will “embellish well” with decorative threads?
A: There are no hard and fast rules for fabric that will embellish.  If you tend to like a hint of glitz, use thread that blends with your fabric.  If you are like me, you go for the highest contrast you can find.  I love bling!  When a fabric is talking to me, I will look for areas that will "pop" with the addition of decorative stitches and threads.  Large prints are a blast to play with.  You can outline a motif, cut it out and collage it to a tone-on-tone fabric or pick one element of the design and repeat the stitch whenever it appears.  Again, there are no rules.

Q: What are your suggestions or tips for using a metallic thread in the needle of your sewing machine?
A: When using metallics I always use a new needle suited for metallic thread (Metafile, Metallica Sharp, Jeans Denim, Top Stitch). They need a sharp tip and a deep shaft for smooth sewing.  I place my thread on a vertical spool pin so it glides through the tension discs without twisting.  I admit, I have to slow down a bit for my normal racing speed, but not that much!

Q: Do you have any tips or a top technique for couching thicker threads like Kreinik 3/8” Trim or Kreinik Braids?
A: I love to couch threads and fibers.  If your machine has a couching foot, this is the time to play with it.  If not, use your open toe embroidery foot so you can see where you are going on your piece.  I like to couch with a decorative stitch (of course) and not just a zig zag.  I'm not saying never use a zig zag because sometimes it is the best stitch for that project.  But try some of the other stitches like the feather stitch.  It makes a fun pattern and you can see the Kreinik braids peaking through the couched thread.  When using a wired thread, I will use a blanket stitch so the I can curve the wired ribbon and only catch a small "bite" when couching it down.

Q: We all just returned from the big quilt industry trade show, International Quilt Market in Houston, Texas. Did you see any trends at the show, anything we can look forward to - or dabble in - in coming months?
A: There were so many tools out there, I almost didn't have time to see them all.  Going to Schoolhouse helped a lot so I could zone in on the vendors that had new items that fit my needs.  I make quilts and garments using raw edged applique and specialize in embellishing.  There were a lot of tools for making dimensional flowers and leaves.  I played with an updated tool for making custom buttons and another for adding snaps.  Sparkle and bling are still in (Yeah!) with thread, beads, crystals and fiber.

I fell in love with several lines of paint and stencils.  Now I must use my holiday break to learn to add these new elements to my designs.  Just think, you can take a stencil, paint a flower and embellish it with Kreinik metallic thread, creating your own fabric.  This would be great for a handbag or tablet cover.  That was another hugh item, new bag patterns featuring cell phone, tablet (Nook, IPad,Kindle), laptops and cute little dressy bags.

Q: What’s next on your schedule? Or what’s on your sewing table now?
A: I am currently working on Jacket patterns for 2012.  My book, Delightful Diva Designs, Wonderful Whimsical Wearables has been out for awhile and I though it would be helpful to have instructions for the newer jackets that I have designed.  These include a bolero, knee length and mid-calf versions.

Q: Where can we find out more about your designs, books, and classes?
A: Visit my website www.karenboutte.com for my schedule.  I do fall behind every so often, but you can check me out on Facebook or my blog, delightfuldiva.blogspot.com.

Note: Karen will be teaching at the Mid-Atlantic Quilt Festival in February 2012. Check out this web page to see Karen's classes: http://www.quiltfest.com/workshop_detail.asp?id=1076

Read more...

Canada's crown jewel of needlepoint

She is quiet, petite, elegant — and one of the most talented designers you will ever meet. Canadian needlework artist Anna-Marie Winter creates stunning embroidery out beads, silk, metallic and real metal threads, makes greeting cards you want to preserve and frame, and shares her expertise with students all over the world. She is also one of the nicest people you will ever meet, one who makes you feel like an instant friend.

We want you to meet this talented designer, creator of the Tree Jewels line of charted needlepoint ornaments, available through Kreinik. These stunning designs look like a million dollars, but the kit is economical, they stitch up easily and finish even more easily, thanks to Anna-Marie's clever directions for molding the canvas on a Styrofoam ball. So we asked Anna-Marie...

Q: Where did you get the inspiration for the Tree Jewels design?
A: The idea for the Tree Jewels came from a guild workshop. My friend was working on a needlepoint ornament that had a narrow band of Blackwork along the center and pulled thread stitches on either side, all worked in perle cotton. I was fascinated by the way in which the halves seemed to mold so easily over the Styrofoam ball but less enthralled by the way in which the color from the perle cotton bled into the surrounding canvas when wet. The technique also reminded me of the stretchy smocked tops I saw in children’s clothes at the time so I started playing with various fibers and stitches to try to create a similar effect. When I combined the Kreinik metallics with a simple pulled Upright Cross stitch for the first time the effect was amazing and that experiment became the first of many Tree Jewels.

Q: You have taught the Tree Jewels in various places and in fact the instructions are written as if you were right there with the stitcher, teaching and guiding them. Can you share any classroom stories?
A: Most students love the project because it can be stitched and finished in the workshop. There is one story that stands out above the rest. During the first day of class the students all work at completing the two halves of the ornament, so that the next day they can complete the ornament by blocking the halves, beading and applying the trim. I usually announce that if a student had completed an ornament by the next day of class, I would finish it for them in class. One student lost her reel of red metallic thread on the way home with only three rows of stitches remaining to complete the ornament. She found a length of red wool that matched the metallic thread and used it to complete her remaining rows. She was very proud of her accomplishment, being first in class to have the work completed and commented that she would put the "wool side" facing the tree and display the good side "out". I used her ornament in class to demonstrate the finishing techniques and effectively hid the wool behind the trim.

Q: Your instructions say, “This is one of the few canvaswork designs where it is recommended that you have fun with your stitching while you break all the rules.” That sounds fun! But what do you mean?
A: When stitching a Tree Jewel, many of the rules in canvaswork are broken mainly to make the work more enjoyable and to allow the form to mold properly over the canvas. The canvas is worked in hand, not on rigid stretcher bars. Working on stretcher bars will not allow the canvas to mold properly. The knots and tails are not worked neatly on the reverse side of the canvas, but are left on the right side of the canvas as they are cut off during the finishing process. The canvas can be rolled and kept in a plastic bag in your purse or pocket, so the project is always on the go in a waiting room or taking the bus to work and where you would never submerse your traditional needlepoint in water, a Tree Jewel is "born" under a running faucet.

Q: Is there a frequently asked question about the Tree Jewels?
A: The most frequently asked question is whether the size of the ornament can be reduced or enlarged. It can be reduced to mold over a smaller Styrofoam ball or enlarged to make a much larger "kissing ball". The design is easily adaptable to variations in size.

Q: We love the portability of the project. It would be fun to know the various places where a Tree Jewel has been stitched.
A: I'm not sure where other people have stitched their Tree Jewels, but I've worked many at soccer games, in airport waiting rooms, on airplanes using plastic needles, at the doctor's office and on long car trips. I found that the zip lock bag was an invaluable tool in completing many projects.

Q: The finishing is fabulous - in part because it can be done at home, inexpensively. Any tips or suggestions on doing the finishing part?
A: One tip that I would like to pass on is to choose the finishing materials carefully. The stitcher has put a lot of time and effort into the stitching, but using the wrong ribbon or trim can take away from the elegance of the ornament. Using a high quality velvet ribbon for example, rather than a cheaper flocked craft ribbon, makes a huge difference in how the ornament will look when completed.

Q: Are you working on any new designs right now or currently teaching? Where can stitchers buy some of your other designs?
A: I am currently working on two projects, a small Christmas stocking that is a continuation of the Women of Government House project and a larger design called Summer's End, which is a design of a butterfly on grass that was created from a number of photo images and transferred onto canvas. I do teach a number of online classes through my website and www.BedeckedandBeadazzled.com. My teaching pieces and classes are listed on my website www.annamariewinter.com.

Read more...

Silk gauze and Patricia Parra

Once upon a time, a young girl stitched a sampler on gauze. It must have been meaningful gauze — the placard on the museum wall next to this framed needlework said it was gauze leftover from her family's care of a wounded Civil War solder. Romance makes me wonder if she was in love with this boy, and stitched her sampler on something that would remind her of him. Or maybe, she just wanted the medium, the finely woven canvas mesh on which she could achieve amazing detail for her palette of stitches.

If so, she wouldn't be the first or the last to stitch on gauze.
Silk gauze — canvas mesh made of 100% pure silk thread — has been used in clothing, jewelry, embroideries and other textile work for centuries. Today it is common for miniaturists to use silk gauze for to-scale reproductions like rugs, miniature pillows and samplers. Silk gauze comes in different holes-per-inch sizes, so with 40-count silk gauze, for instance, you get 40 holes per inch, and a perfect 1-foot to 1-inch scale.

Other needle artists use silk gauze as an alternative medium and for creating intricate needlework. One silk gauze embroidery designer we are excited about is Patricia Parra. She has taken Kreinik silk gauze kits and added stunning specialty-stitch borders. Her particular use of decorative stitches creates more three-dimensional looks on silk gauze. When she uses Kreinik's holographic threads on silk gauze, her designs look simply magical.


A native of South America, she has had an interest in needlework since she was a child.  Her mother was a clothing designer so she has always been exposed to color and design.  Patricia opened a San Francisco needlepoint store in 2005 and started teaching and creating stitch guides. In 2007 she discovered silk gauze and fell in love with the delicate work. Her silk gauze patterns include traditional themes as well as contemporary geometrics using specialty stitches and lots of color. Patricia often loans us her silk gauze models to take to shows, and we are excited to share photos here.

Where to get more information on silk gauze:
• For more photos of the designs shown here, visit http://flickr.com/photos/kreinikgirl
• Patricia Parra, visit http://www.sfstitch.net/
• For Kreinik silk gauze, available in framed ready-to-stitch pieces or yard increments, visit
http://www.kreinik.com/kshop/home.php?cat=44
• Kreinik silk gauze is available in needlework stores (visit h
ttp://www.kreinik.com/locator) or through stores in http://www.kreinikmall.com
• Check with your needlework store for other artists creating silk gauze designs. Erica Michaels Designs, for instance, has a new line of "Petites" silk gauze kits,
http://www.ericamichaels.com.

Read more...

Search This Blog

About This Blog

News direct from thread maker Kreinik Mfg. Co., Inc., located in Parkersburg, West Virginia. Visit our factory outlet store when you are in the area; call for hours 1-800-537-2166.

  © Template by Ourblogtemplates.com

Back to TOP